

Saturday 31 December 2011
Cushions - seabird print
Granny Annie gave Martha a lovely chair for Christmas. I have just covered some cushions for it to make it super comfy.
Friday 30 December 2011
Coffee sack wall art & pin board
Jute coffee sacks are amazing for craft projects. I love making things with them. In the past I have made wedding invites, christmas stockings and even seat covers using the humble hessian coffee sack. My latest coffee sack creation has been making a pin board and a wall art picture for my husbands corner of the shabby (definitely not chic) area of our lean-to/conservatory space. He is a huge coffee snob/nerd so it is the perfect decoration for him!


Thursday 29 December 2011
Handmade sewing machine cover
I have just completed my first project from a great book i received for Christmas. It is called '101 ways to sew a metre'. This book is full of brilliant ideas and covers items such as bags, cushions, clothes and even ironing board covers! The selling point of the book is that all the ideas in the book use less than a metre of fabric so they are also fairly cheap and cost effective to make. The sewing machine cover was really quick to make, instructions easy to follow and I am pleased with the result. Making your own also ensures you get the cover to fit and i think it looks much nicer than the boring white cover the machine came with.

Wednesday 14 December 2011
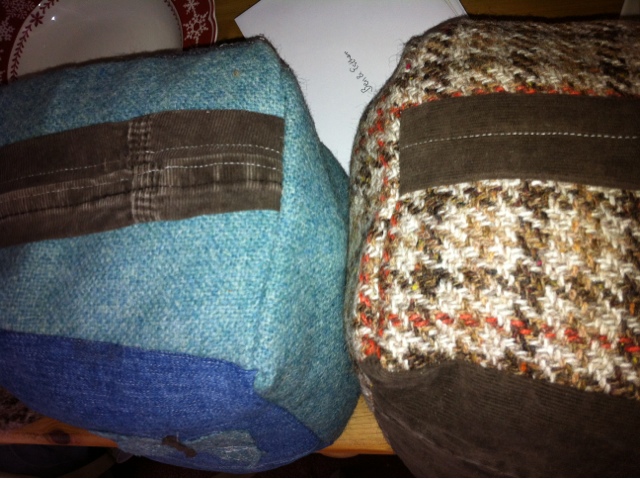
Handmade fabric box door stops
Recently I have been making these chunky door stops out of remnants in my fabric box and some tweed given to me by a friend of the family. Each has a slightly different motif (i've gone for flower, butterfly and bird) and different fabric composition on each. They are stuffed with normal cushion stuffing and about 1kg of rice per door stop.


Tuesday 29 November 2011
Make your own carrier bag holder in under 30min!!!

 This project is so quick and easy to make and it only uses up 1 fat quarter of fabric. If you are anything like me you will have purchased many of these tempting squares of fabric on a total whim with a faint belief that they will get used one day. But in reality they just sit in the fabric pile never quite making it in your selection for the latest project - well here is the project!!!
Step 1 Take 1 fat quarter of fabric and cut off a strip of about 10cam wide.
Step 2 Using the bigger piece of fabric, match up the 2 longest sides with pattern facing and sew together. Press the seam.
Step 3 Take the 'off cut' of fabric and make into a handle. I like to sew longest edges together and turn out. But feel free to use what ever method you like!
Step 4 With the main piece of fabric sewn together and still the wrong sides facing out make a seam at the top and bottom of the fabric (choose which end you will sew the handle)- this is where the elastic will go. Make sure you leave a small gap (2cm) to thread the elastic in. I attach the elastic to a safety pin to help push it in. Pull in the elastic to make the fabric ruffle and tie in a knot. Don't worry about sewing the gap up - just tie the ends off well.
Step 4 Sew in the handle. Turn the whole thing and out and there you go you have a handy carrier bag holder in (hopefully) under 30min.
You should have also saved yourself about £10 https://www.cathkidston.co.uk/p-16564-cath-kidston-chelsea-roses-carrier-bag-store.aspx
Saturday 26 November 2011
Handmade birthday bunting
I have just made some personalised bunting for the daughter of a friend of mine. It proved to be the perfect 'nap time' craft taking under 40 minutes to make! I cut out 16 triangles. Then paired them up and stitched triangles together (right sides in) Then all you need to do is turn them out, press them and see them between some binding. The letters were formed using ribbon.
Tuesday 22 November 2011
Handmade Draught Excluder


During Martha's nap today i made a draught excluder. I used up lots of fabric off-cuts including denim from old jeans and some corduroy trouser fabric. I used heavy weight fabrics to create a warm and cosy looking draught excluder. To make it more interesting i appliqued letters and hearts onto the fabric and may also sew on some buttons (but still undecided on that!).
Friday 11 November 2011
up-cycled skirt


Tuesday 8 November 2011

Christmas cards- batch 1
Today I made my first batch of Christmas cards for sale at 'Mia Bella casa' a lovely home wares and gift shop in the west Sussex village of ferring. I used some 'easy of India' merry Christmas ribbon and scraps of fabrics and buttons.


Monday 24 October 2011
Sock Creatures - How to make a sock rabbit

Step 1: WHAT YOU NEED
Choose a sock - I like to use ones with coloured heels (this becomes the face)
You will also need: thread, buttons and stuffing

Step 2 CUTTING
Snip off the top section of the sock and divided into two (these are the arms)
Snip about 3cm from the toes of the sock up towards the heel (these become the legs)


Step 3 SEWING
Turn inside out and sew the parts up (leave a gap somewhere to turn out)
The arms will still be separate at this point


Step 4 STUFFING THE SOCK
You can use a pillow stuffing, toy stuffing, cotton wool - whatever you have!
Step 5 FINISHING TOUCHES
Then attach the stuffed arms to the body.
Then sew the face or use buttons.

Gift idea: mulled wine spice kit mix and recipe


A Mulled Wine Kit makes a lovely Christmas gift (especially if you also include bottle of wine!)
This is how i made mine:
Step 1: Make the spice mix - I included 2 Cardamom pods, 12 cloves, 1 cinnamon stick, 2 star anise and 1 nutmeg. If you live in Cambridge the 'Daily Bread Co-op' sell a great selection of spices.
Step 2: I made a basic bag out of Hessian to put 3 portions of the spice mix in (bag made by using 2 rectangles of Hessian stitched together and turned out)
Step 3: I then made a gift label and included my recipe on the back
My recipe "Put 1 portion of the spice mix in a saucepan with 1/2pint of water, 1 bottle of red wine and 2 tsps of granulated sugar and heat to simmering point. Stir until all the sugar has dissolved. Keep it at simmering point for at least 20 minutes – but do not boil or all the alcohol will evaporate."
Step 4: Using raffia and a wooden peg i attached the bag and label to a bottle of red wine.
 |
| Mulled Wine spice kit |
Thursday 29 September 2011
Lampshade - Decorated with a selection of vintage buttons (work in progress)


Handmade Cards - birthdays and weddings


A selection of the cards i have been making recently for Birthdays and weddings. Buttons seem to be the theme of the moment!
Thursday 22 September 2011
Gift Tags: Buttons & Luggage Labels


I have been making pretty button card gift tags. They can be used as as a functional gift tag and have space on the back to write a personal message. I also think they make a really sweet little present and are so light that they won't cost much to pop in the post to a friend! I love mother of pearl buttons and they can be used in so many different craft projects. The buttons are hand sewn onto card and are then mounted on to decorative papers and fixed on to a traditional brown luggage tag. Christmas tags coming soon!
Saturday 3 September 2011
up cycled desk


Upcycling is so much fun and can produce such satisfying results! This bureau style desk was originally my mothers when she was a child. However over the years layers of thick gloss paint had been applied to it and it had really seen better days. A few years ago my parents even tried selling it for a mere £5 at a car boot but nobody was interested. So the (self appointed) challenge arose for me to give some new life to it (with the hope it could be used by Martha when she is bigger). The thing i particularly liked about the desk was its small scale and the separate compartments. The compartments will be fun for Martha to hide things away in and arrange special keepsakes. I collected a number of different papers including some old wrapping paper, maps and books to collage directly on to the desks surface. I was really pleased with the Penguin book wrapping paper which I used on the shelves. It has now been transformed into a fun piece of furniture perfect for Martha's room.
Wedding Season


Martha's wedding shoes in action; (well kind of) there was one major flaw, she kept taking them off and playing with them. I must remember next time to make them look really boring!
Monday 25 July 2011
Handmade Baby Shoes - floral fabric


I have finally got around to making some special shoes for Martha to wear to her Uncle George's wedding in August. I was able to learn from my mistakes in my previous shoe attempts and am really pleased with these ones. I now need to find a way of Martha being less interested in them as she constantly tries to eat them!
Sunday 3 July 2011
Picnic Cutlery Wrap
My latest project is to rejuvenate my old picnic hamper which originally belonged to my Grandparents and which i subsequently rescued from a life of storing fishing equipment in my parents garage. I hope by the end of the summer it will be fully kitted out for use on our family picnics! So my first task was cutlery storage, using a tea towel i have stitched together a wrap for storing my picnic cutlery. There are designated pockets for knives, forks and spoons. I used some 'east of India' ribbon to tie the wrap together. Picnic napkins and a fabric liner for the hamper coming soon.........


Subscribe to:
Posts (Atom)